Forum settings enables you to add forums to your portal and manage its access permissions. Here you can:
Create Forum
In Zoho Discussions, you can create two types of forums namely pubilc forum and private forum using forum permissions.
Listed below are the various configurations involved while creating a forum:
Configurations
| Descriptions
|
| General Details | This section allows you to update the basic information of your forum. |
| Forum Permissions | This section allows you to configure the perrmissions for your community, on your forum. |
| Moderators | This section allows you to assign the moderator of the forum who will be eventually moderating the replies made to the posts of the forum. |
| Moderator Groups | This section allows you to assign a group of members to moderate the posts of the forum.
|
Public Forum
A public forum can be accessible by all website visitors. They can view topics, post topics and respond to the topics associated with the particular forum.
To create public forum
- Click on Settings > Forum > New Forum.
- In the General Settings section:
- Specify the Name of your forum
- Provide a Description of the forum.
- In the Forum Permissions section:
- Enable the View permission for Everyone or Portal Members
- Enable the Post permission for Everyone, Portal Members or Moderators
- Enable the Response permission for Everyone or Portal Members
- Enable the Attachments permission for Everyone or Portal Members
- Enable the Moderate permission for None, Guest or Everyone
- Enter the Email ID or Name of the person whom you want to nominate as a moderator of your forum, in Moderator text-box
- Select the required Group from the Moderator Groups drop-down list (This section is optional).
- Click on Create.
The new forum is created and available for your community.
Private Forum
A private forum can be accessible only be a specific group of users. For Example: A private forum for your sales team so that they can discuss their sales procedures, marketing campaigns etc.,
To create private forum
- Click on Settings > Forum > New Forum.
- In the General Settings section:
- Specify the Name of your forum
- Provide a Description of the forum.
- Select the Private check-box and select member for your portal.
- In the Members text-box, enter the Name (if registered with Zoho) or Email ID of the required members.
- In the Groups drop-down, select the Groups for which you want to create forum (if required).
- In the Moderators text-box, enter the Email ID or Name of the person(s) whom you want to nominate as a moderator(s) of your forum.
- Select the required Group from the Moderator Groups list drop-down list (if required).
- Click on Create.
The created forum is now available only for the specified members or groups.
| Note: You can view the list of available private forums in the Private Section i.e., Settings > Forums > Private. |
Manage Forum
You must perform the following operations for an effective forum management:
Update General Information
This section allows you to set up or update the general information of your forum.
To update general information
- Click on Settings > Forums.
- Identify the forum that you want to manage from All Forums section and click on Manage.
- In General Settings section, update the forum Name and Description (if any).
- Click on Update.
The General information gets updated.
Set a Forum Logo
Zoho Discussions allows you to customize or add an image to every forum present in your portal. You can upload an image from your desktop or provide the URL of your favourite logo.
To upload a forum logo:
- Click on Settings > Forums > Manage
- Choose the General tab and scroll down to the "Customization" section
- Click on Change logo link to upload your forum image.
The forum logo will now saved.
Configure Forum Permissions
This section allows you to update or modify the permission settings of your forum.
To update permission settings
- Click on Settings > Forums.
- Select the forum for which you want update permissions from All forums setcion and click on Manage.
- Configure the required Forum Permissions (refer: Create Forum - Forum Permissions section) and click on Update.
The forum permissions gets updated.
Set up Forum Moderators
This section allows you to change or update the moderators of your forum.
To update moderators
- Click on Settings > Forums.
- Identify the forum for which you want update the moderator information from All forums setcion and click on Manage.
- Specify the Name or Email ID of the moderator in the Moderators text-box
- Click on Update.
The moderator information gets updated for your forum.
Create Forum Widgets
Zoho Discussions also allows you to create individual widgets for every forum in your portal. You can include forum links and HTML widgets in your forum.
| Note: By default, portal widgets is displayed in the forum page, if there are no forum widgets. |
To add Forum links
- Click on Settings > Forum > Manage
- Goto Forum Widgets tab and click on Add New.
- Specify the Name and URL of the Forum Link.
- Click on Save.
The specified forum link gets updated.
To add HTML Widgets
- Click on Settings > Forum > Manage.
- Goto Forum Widgets tab and click on Add HTML.
- Specify the Name and the HTML Content that you would like to add in the forum.
- Click on Save.
The specified HTML widget gets updated.
Manage Forum Widgets
Here you can view the list of all widgets associated to every forum in your portal. You can manage these widgets by reordering their position and also choosing/removing the preferred widgets according to your business needs.
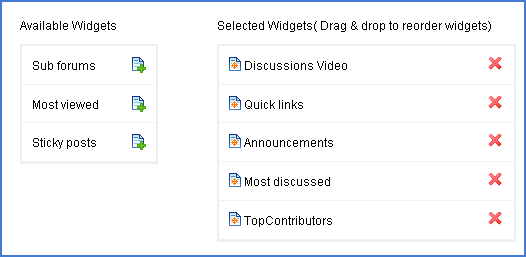
To add widgets
- Click on Settings > Forum > Manage > Manage Widgets.
- Select the widget from Available Widgets column and click on the Forward button
The corresponding widgets is now displayed in Selected Widgets column and updated in your forum.
To rearrange widgets
- Click on Settings > Forum > Manage > Manage Widgets.
- Change the order of the widgets by dragging/dropping the required widget listed in Available Widgets column
The order of the widgets is updated in your portal.
To delete widgets
- Click on Settings > Forum > Manage > Forum Widgets.
- Select the widget that you would like to remove and click on Delete.
The selected widget is deleted from your forum.
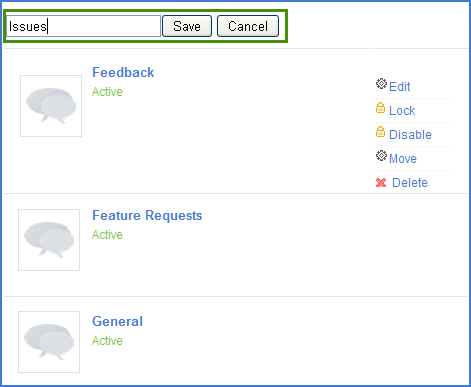
Lock Forum
Locking a forum allows you to end all active discussion. When a specific forum is locked, it stops your forum members from adding topics, posting responses, comments in the corresponding forum.
To lock a forum
- Click on Settings > Forums.
- Identify the forum that you want to lock from All Forums section.
- Click on Lock.
The selected sub forum is now locked from posting. You can unlock the forum using the "Unlock" link, whenever required.
| Note: You can also lock the forum by selecting the "Lock this forum" check-box, available in the specific forum's General Settings section. |
Disable Forum
Disabling a forum helps you to hide the forum from your portal. When a specific forum is disabled, all information associated to the forum ( such as topics, responses etc., ) will be completely hidden from your portal. It cannot be viewed by your forum members.
To hide a forum
- Click on Settings > Forums.
- Identify the forum that you want to hide from All Forums section.
- Click on Disable.
The selected sub forum is now disabled from viewing. You can enable the forum using the "Enable" link, whenever required
Create Sub Forum
Sub forums helps you to classify your forums into different sub categories. For Example: If you have a forum called "Sports", you can create sub forums such as "Cricket", "Football" etc., so that users can post topics in related subjects.
To create a sub forum
- Click on Settings > Forums.
- Select the forum which you want to create a sub forum from All Forums list
- Click on Manage and select Sub Forums tab.
- Click on Add Now link and specify the Name of the sub forum.
- Click on Save.
The sub forum is now created.
Manage Sub Forum
The manage sub forum section allows you update and manage the following configurations:
Edit Sub Forum
Editing a sub forum allows you change the name of the sub forum created.
To edit a sub forum
- Click on Settings > Forums > Manage.
- Select the Sub Forums tab and identify the sub forum that you want to edit.
- Click on Edit and modify the Name of the sub forum.
- Click on Save.
The modifications gets updated.
Lock Sub Forum
Locking a Sub forum allows you to stop your forum members from adding topics, posting responses, comments in the corresponding sub forum. However, members are allowed to view and post topics in its associated forum.
To lock a sub forum
- Click on Settings > Forums > Manage.
- Select the Sub Forums tab and identify the sub forum that you want to lock.
- Click on Lock.
The selected sub forum is now locked from posting.
Disable Sub forum
Disabling a forum helps you to hide a particular sub forum from your portal. When a specific forum is disabled, members cannot view its associated to the sub forum.
To disable a sub forum
- Click on Settings > Forums > Manage.
- Select the Sub Forums tab and identify the sub forum that you want to disable.
- Click on Disable.
The selected sub forum is now disabled from viewing.
Move Sub Forum
Zoho Discussions allows you to move a sub forum from one forum category to another.
To move a sub forum
- Click on Settings > Forums > Manage.
- Select the Sub Forums tab and identify the sub forum that you want to move to another forum.
- Select on Move and select the required Forum from the drop-down list.
The sub forum and its associated topics are now moved to the selected forum.
Delete Sub Forum
In Zoho Discussions, you can delete sub forums in two ways:
- Delete sub forum and its associated topics
- Delete sub forums and move its associated topics to another sub forum
To delete a sub forum
- Click on Settings > Forums > Manage.
- Select Sub Forums tab and identify the sub forum that you want to delete.
- Click on Delete.
- In the Select Delete Option dialog-box, click on the required radio-button.
- Click on Delete to remove the sub forum or Move to move the topics to another sub forum.
Email2Forum
Zoho Discussions facilitates you to create topics through email using Email2Forum functionality. To use this function, you must configure an Email ID to receive topics in Zoho Discussions. Later, every message that are sent to the configured Email ID gets posted as a topic in your portal, with the topic type as "Discussions". You can also change the topic type according to the content.
For Instance: You have created an individual Email ID to receive feedbacks from your customers as feedback@zoho.com. In this scenario, you can go ahead and configure the Email ID feedback@zoho.com in the Email2forum section. This helps you to receive all feedbacks from customers, as topics in Zoho Discussions.
To configure Email ID
- Click on Settings > Forums > Email2forum
- Click on Configure a new E2F link and do the following:
- Forum: Select the required forum in which you want to receive topics
- Sub forum: Select the sub forum associated to the forum selected.
- Email: Specify the Email that you would like to configure.
- Password : Specify the corresponding password of the Email ID.
- Click on Add.
The specified Email ID is configured and all messages sent to the Email ID will be posted as topics in the corresponding forum selected.
Feedback Widgets
Zoho Discussions enables you to create feedback widgets and embed anywhere in your website. It provides a easy way for your customers to leave you feedback directly from yoru website, without having to enter your discussions portal.
You can create a feedback widget for each one of the forums in your account, so that you can include the most relevant widget in your page. In addition, all the information that are captured will automatically be routed to the applicable forum - just like any other post on your online forums and make it public. You can also choose to make it private and and get it via e-mail, according to your requirement.
To create the feedback widget, you must follow the below steps:
Create Feedback Widget
- Click on Settings > Forums > Feedback Widgets.
- Click on create new feedback widget link and enter the mandatory fields:
- Widget Name: Enter a display name for your feedback form.
- Forum: Select the applicable forum in which the feedback should be posted.
- Subforum: Select the sub forum associated to the forum
- Email ID: Specify an Email ID to receive the feedback.
- Optional Configurations: This optional configuration allows you to decide how you want to receive the feedback. You can keep it private or public according to your requirement. The different configurations are:
- Only Email: Feedback will be sent to the configured Email ID.
- Only Post to forum: Feedback gets posted as a post in your forum.
- Both by default: Feedback will be posted and also sent to the configured Email ID.
- Post to forum as optional: When you enable this option, users will be shown with a "Post in Zoho discussions Forum" check-box. They can enable/disable to decide to post their feedback in your forum or send to your email.
- Click on Add.
Email Notification
- Once added, a confirmation link will be send to the configured Email ID. You must click on the given link to generate the Widget code/HTML content.
Copy HTML Code
- Go to your portal > Settings > Forum
- Click on Feedback Widgets tab and copy the HTML content from Widget code field.
Integrate Feedback Widget
- Now, you can embed the HTML Code in your website/blogs and receive feedback from your customers.
 Uploading ....