Listed below are the configurations that you can update in General settings:
Settings
Description
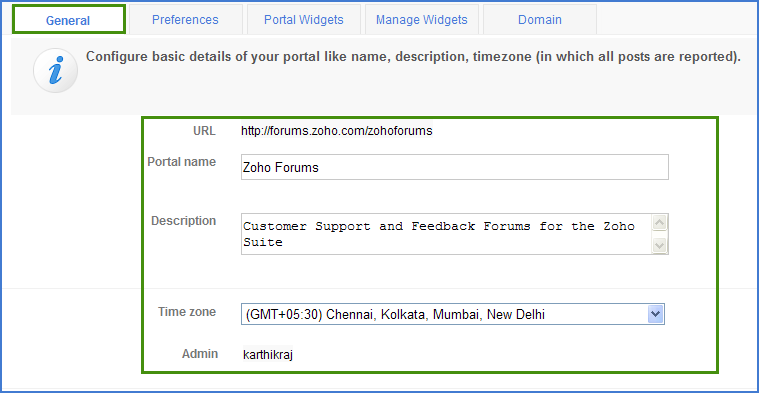
URL
The URL field in General settings displays the URL of your portal. This setting is not useful once you map a domain to your portal. For info on how to configure and manage portal domains, skip to here.
Portal Name
Portal Name will be displayed prominently when the discussions portal is accessed. This is the name your user community uses to refer to the discussions portal. You can specify a name for your portal in the given text box and it gets dispayed as a portal header.
Time zone
You can set up the required time zone for your portal as per your country scale. Zoho Discussions provides you a list of time zones based on GMT.
Zoho Discussions allows you to specify additional information about your portal that includes tag line, keyword, significant feature etc., as your portal description.
Admin
A non-editable list of portal administrators. Additional admins and moderators can be managed by using the User management module.
To update general information
Click on Settings > Portal from the side-menu. By default, the General tab is selected.
In the Portal Settings section, update the required information in the corresponding text-box.
Click on Save. The general settings of your portal gets updated.
Configure Portal Preferences
You can customize your portal preferences according to your business requirements in Preferences section. Zoho Discussions lets you to customize the following preferences:
Brand Logo
Brand logo is the visual identity of your product or business. Zoho Discussions provides you the ability to configure your brand logo in simple steps, which will be displayed prominently in your portal header.
To upload a logo:
Go to Settings > Portal > Preferences It displays the list of preferences that you can configure
Click on Upload Logo tab to Browse an image from your local disk (or)
Click on URL link and enter the URL of the required image
Click on Save Your portal logo gets updated.
Favicon
Favicon is your shortcut icon that gets displayed in the address bar of your portal. You can upload your favorite image the Favicon section.
To upload a favicon:
Go to Settings > Portal > Preferences. It displays the list of preferences that you can configure.
Scroll down to Favicon section and upload the required image.
Click on Save Your portal favicon gets updated.
Notification
This section helps you to choose the notification type, in which you wish to receive updates about your watchlist items. Zoho Discussions offers two types of notifications:
Email Notification: When email notification is enabled, you and your users will receive wathlist notifications via Email
Chat Notification: When chat notification is enabled, you and your users will receive watchlist notifications via chat feed
To enable notifications:
Go to Settings > Portal > Preferences. It displays the list of preferences that you can configure
Click on the Email/Chat radio button to select the required Notification preference.
Click on Save
Zoho Chat Preference
The Zoho Chat preference allows your users to have real-time interactions within your discussions board. This is ideal for an intranet and a support forum set up, where your colleagues / experts / friends could help you out quickly by obtain more detailed information to troubleshoot etc.
To integrate Zoho Chat preference:
Go to Settings > Portal > Preferences. It displays the list of preferences that you can configure
Select the Zoho Chat preference by clicking the Enable check-box
Click on Save
Once chat is enabled, you can choose to receive watchlist notifications through Chat Feed by enabling the corresponding check-box.
Landing Page
Landing page is the home page of your portal, which your visitors/users see when visiting your online community. You can choose your landing page between Recent Topics and All Forums.
To choose portal landing page:
Go to Settings section
Click on Preferences tab under Portal settings from the left side menu
Choose Recent Topics (or) All Forums to be your portal landing page
Click on Save Your portal landing page gets updated.
Advanced Filter
In addition to "Predefined" Filters, Zoho Discussions offers Advanced filter options, which helps you & your users to quickly identify the topics that are more relevant for them. You can filter topics based on topic types, topic status and also filter un-replied posts easily.
To enable advanced filter:
Go to Settings section
Click on Preferences tab under Portal settings from the left side menu
Choose Yes to enable the advanced filter option for your portal
Click on Save The advanced filter option gets updated.
Customize Topic Types
Zoho Discussions allows you to customize the topic types of your portal according to your business requirement. With this customization, you can easily create a Q&A forum, or an Idea board or a customer support community, etc. For Example: If you want to setup an idea board, you can only choose to have the topic type "Idea" for your portal.
To customize topic types:
Go to Settings section
Click on Preferences tab under Portal settings from the left side menu
Scroll down to the Customize Topic Types section
Choose the required topic type(s) and click on Make it default button
Click on Save The default topic type gets updated for your portal.
Membership Subscription
This section allows you to configure and manage the membership subscription for your portal. With this preference, you can allow your visitors (non-registered users) to subscribe and become a member of to your portal directly, without having to send them user invitation. i.e., any user who is interested in your community can join your portal and take part in online discussions.
You can configure the portal subscription preference in different ways:
Open: If open, any website visitor can directly become a member of your portal by clicking on the Join Now button. This specific configuration is ideal for public portals.
Moderate: If moderated, all membership requests will be waiting for moderator/administrators' approval. Users can participate only if their subscription is approved. This specific configuration is ideal for private portals.
Disable: If disabled, the subscription model will not be available for your users.
To enable membership subscription:
Go to Settings section
Click on Preferences tab under Portal settings from the left side menu
Scroll down to the Membership Subscription section
Choose the required configuration and enable the corresponding check-box
Click on Save
The membership subscription gets activated.
Language
The Language section enables you to set the default language of your portal language. Zoho Discussions can be localized in 10 different languages namely French, Turkish, Japanese, English, Chinese, Dutch, Norwegian, German, Spanish and Portuguese.
To choose portal language:
Go to Settings section
Click on Preferences tab under Portal settings from the left side menu
Scroll down to the Language section
Choose your preferred language from the drop-down
Click on Save The portal language gets updated.
Note: If you choose the language to Default, the discussions portal can be viewed according to the language of the browser.
Private Messages
Zoho Discussions provides you and your users the ability to send private message within your community. You can enable the private messaging preference for your user profiles, so that your portal members will be able to send messages to other members of your portal. You can choose to "Enable for all users" or "Enable for Users with atleast 5 posts".
To enable private message option:
Go to Settings section
Click on Preferences tab under Portal settings from the left side menu
Scroll down to the Private Message section
Choose the required option and click on Save
Topic quick view
You can enable the topic quick view preference as your default topic view of your portal.
To enable topic view:
Go to Settings section
Click on Preferences tab under Portal settings from the left side menu
Scroll down to the Topic Quick View section
Choose Yes to enable the topic quick mode The default topic view gets updated.
In addition, if you wish to activate nice URLs for your portal, you can enable the "Quick View" mode, which helps you set SEO-friendly URLs for all admin options and topics.
SEO Settings
SEO Settings allows you to add/specify meta tags like meta keywords and meta description, for your portal. This in turn help your content be more visible to search engines and engage more number to visit your portal and participate in discussions.
To update SEO settings:
Go to Settings section
Click on Preferences tab under Portal settings from the left side menu
Scroll down and move to the SEO settings section
Enter your meta keywords in the SEO Keywords text box
Type-in your meta description fin the SEO Description text box
Click on Save
Note: These preferences affect the look, feel and behaviour of your portal for all members.
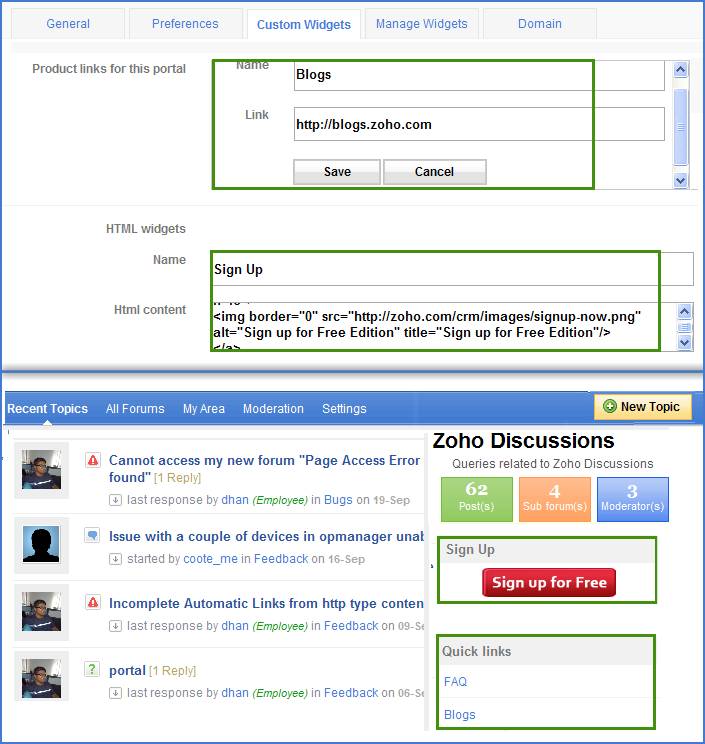
Custom Widgets
Zoho Discussions helps you to create custom widgets to enhance your marketing opportunities. The custom widgets can be Product Links and HTML Widgets.
Product Links Product Links can be used to promote your products or services. It can be any quick links to access your services, Website URL, blog URL, support URL etc.,
To add Quick links
Click on Settings > Portal > Portal Widgets.
Click on Add New Link in Quick Links section and specify the Name of your widget and the Product Link
Click on Save. The specified quick link gets updated.
HTML Widgets
You can embed any html codes in your portal to allow your visitors to make the most use of it. You can embed the code of specific objects, images, iframe etc.,related to your product or service.For Example: You can add the SIGN UP link of your product.This allows your customers to sign up to your product quickly directly from the forum, without having to enter your product website.
To add HTML Widgets
Click on Settings > Portal > Portal Widgets
Click on Add HTML Widget inHTML Widgets section and specify the Name and HTML Content (HTML Tags)
Click on Save. The specified html widgets is updated in your portal
Note: You can also include your open source social links in HTML Widgets.
Manage Portal Widgets
Here you can view the list of widgets available in your portal. You can manage these widgets by reordering their position and also choosing/removing the preferred widgets according to your business needs.
To rearrange widgets
Click on Settings > Portal > Manage Widgets .
Change the order of the widgets by dragging/dropping the required widget listed in Available Widgets column. The order of the widgets is updated in your portal.
To delete widgets
Click on Settings > Portal > Custom Widgets.
Select the widget that you would like to remove and click on Delete link. The selected widget is deleted from your portal list.
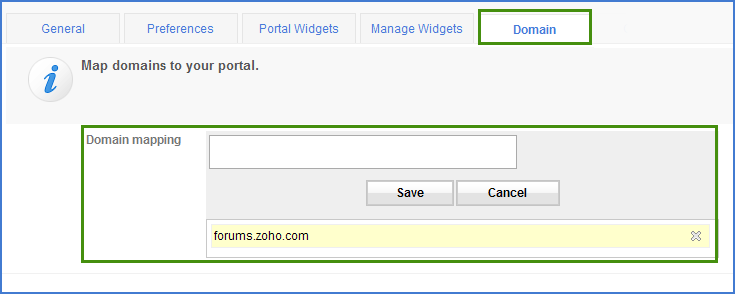
Map Domain
The Domain section allows you to configure/map any URL which you own with your portal. This provides intuitive access to your users and improves search engine optimization. i.e., You users can visit your portal at the configured domain, instead of the default URL # discussions.zoho.com.
To configure domain mapping
Go to Settings > Portal and select the Domain Tab.
Click on the Add domain link.
Specify your Domain name in the Domain Mapping text-box. The corresponding domain is now mapped with the portal.
Once that is done, point your domain CNAME entry to this IP address: 74.201.154.141
If you add multiple domains, you can make a particular domain as the "default" domain. Zoho Discussions will re-route all users to the specified domain.
 Uploading ....